A Brainwave Based Solution With Which Completely Paralyzed People Can Communicate With Their Loved Ones Using a Muse EEG Band

I am an enthusiastic developer since my childhood. I have started with Plus 4 and C 16 machines programming in Basic. I still remember when we were jumping on the bed with my brother, and accidentally saw the Commodore 64 computer on the top of the wardrobe, which was planned to be a Christmas gift for us. I don't have to tell you that we couldn't wait till then. :) I will never forget this memory. Of course in the beginning we only played on the computer, but later I became interested in how can I make my own programs. I have to tell when I first faced the binary number system I did not understand it, but I was still able to draw some sprites on the screen. :)
I continued learning software development during grammar school. I got my Masters degree at the Budapest University of Economics and Technology where I learnt many languages and also learnt a lot about general software development theory and practice.
I have started my professional career as a C++/C# developer, but I switched to Java after a few years. I've visited many meetups and Code Retreats during this time and I've learnt and introduced Agile methodologies in our company. During the years I lead the development team in close cooperation with the product management and testing department.
In 2020 I felt I need something new and I turned towards test automation both API and UI. I did not regret my decision. Since then I tried many frameworks like RestArrured, Selenium, Protractor, Appium, Selenide and Karate.
At the moment I am working as a Senior Software Developer in Test using Selenium and Selenide for UI testing and Karate for API testing.
I believe knowledge sharing is very important, so apart from helping my colleagues work I started my technical blog recently: https://mszeles.com Sharing your knowledge provides many ways for your own development. Whenever I write an article many questions come into my mind which might be interesting for the readers, so I try to answer all of them in my posts. Doing this I learn a lot about the subject. In additionally sharing your knowledge gives a good opportunity for feedback based on which you can further improve.
From this article, you can learn how you can get access to your brain from your app for the price of a mid-level mobile phone by buying an EEG band and an app with which you can get the raw EEG data from the device.
I will lead you through the development of an app with which you can detect eyeblinks using a Muse S EEG band. We will convert the eyeblinks to text using the Morse code. As a result, we will have a solution with which completely paralyzed people can communicate with their loved ones.
I will also demonstrate how you can build an app in pure Python with the aid of Kivy resulting in a program that can be packed to Android, iOS, Windows, and Mac.
Before we start coding, please let me share some moments from my life which led me to start tinkering with my brain.
The Backstory
My First Contact With Brainwaves
Let's move back 30 years in time.
I was sitting in front of my Commodore 64 computer in my room. My brother had already moved out by then, but I was not alone, as my friend Szabi was also with me.
I loved computer games. Playing games like Ugh Olympics, Pirates, Defender of The Crown, Boulder Dash, Wizard of Wor, Nebulus, and Bruce Lee gave me more pleasure than anything else in the world.
At that time, I was playing a newly discovered game called Benji. I was trying to figure out how to play the game with little success.
Suddenly I saw something in the corner of my eye, so I turned right to look through the window. There was nothing unusual except one thing.
A black figure was floating in the air above the roof of our garage.
I got scared as hell, so I asked Szabi whether he also saw the figure or not.
No! There is nothing there. - he replied.
Szabi went downstairs to tell my parents what had happened to me. My parents came up in a hurry, and they quickly realized something was not ok, so they saw me down in the living room.
I remember they asked what my name was. I started to think, but I couldn't answer as I couldn't recall it. The feeling I felt at that moment when I couldn't remember my name had been burnt into my mind for eternity.
From this point, I couldn't recall anything as I lost my consciousness. A few seconds after my parents called the doctor, my whole body started to shake unstoppably.
That was the first time when I had an epileptic seizure.
My next memory is being in the hospital. A few hours later, a nurse led me into a room, lubricated tiny thingies with a cold gel, then put a bizarre hat on my head. The hat was strange as many wires were coming out of it, all of them connected to a machine.
I had to lay down and stay calm, and then the machine drew lines on paper.
As I found out later, those were my brainwaves, and the machine was an electroencephalography (EEG) device. I couldn't understand the EEG diagram, but based on what I heard, they looked pretty bad back then.
A couple of days later, I could go home.
I was not allowed to play on computers or watch TV, and I couldn't go to the disco with my friends.
Fear became my and my family's best friend from that point as we could never know when another epileptic seizure would come.
During the upcoming years, I had to take medicines, and I also had to visit the hospital many times to have regular checkups with a neurologist. During these visits, I started to form a friendship with this EEG device. Month by month, my EEG results became better and better.
I can still remember the room's smell, the feeling of the cold gel, the long wires, the small diodes, the strange hat, and the EEG curves painted on paper.
I never had another epileptic seizure again, and after three years, my neurologist told me I had recovered.
My Second Contact With Brainwaves
The year is 1994, just two years after my epileptic seizure. My parents enrolled me and my brother Tomi in a Silva Mind Control for kids course.
I have very few memories, but I remember when I heard about delta, theta, alpha, and beta brainwaves. I have not just heard about them, but I also learned how to control the brainwaves by relaxation in theory.
I visited the Silva Mind Control training with my friend Edit four years later. By then, I understood and learned many techniques that were taught there.
Even if none of the magical techniques would work, I still learned about peg lists and relaxation.
In reality, I used the other techniques, and I do believe they worked, but as I had no parallel life (at least I am not aware of that) in which I could live the same life without doing the Silva course, I cannot tell if my achievements were related to those techniques.
One of the biggest benefits of the course was learning relaxation. Unfortunately, there was one massive problem with it:
I couldn't tell if I was really in alpha or not. More on that later.
A few years later I went to the Budapest University of Technology (BME) and I became a scientistish.
Scientistish means I do not believe in anything except it was proven by science. Thanks to this, I was sure all the Silva methods were fake similar to all the other supernatural things I have heard of.
My Third Contact With Brainwaves
Twenty-four years later, we arrive in the present. During the last years, I went through an emotional rollercoaster. I had such deep depression I was sure I would lose my job, my flat, my family left me, I became homeless, and I will even be bad for a homeless, and I die in a couple of days.
I know it sounds funny, but that was my reality back then.
It took me two psychologists, 2 psichoterapeut, a RED EQ trainer, and the support of my family and friends, but finally, I managed to come back.
This experience has changed my life forever. I am currently re-reading Eckhart Tolle's The Power of Now Book, and I see some similarities between his life and my life. However, I did not become homeless in reality, I was homeless in my mind. Now I understand much more from that book.
Also, by now, I have become a hscienistish. Hscientistish means I believe in what humans say, and I try to verify it by talking to that person and using somewhat scientific techniques.
I cannot tell exactly what the trigger was. Still, I decided to order a Muse EEG band and examine my brainwaves during experimenting with different meditation and relaxation techniques to find out which worked and which did not.
My Muse S arrived three weeks ago, but before it arrived, I had already come up with an idea in which I could combine programming and my brainwaves. Before I get to the point, please let me tell you about how I got inspired to implement my first mind-controlled app.
The Inspiration
I was googling different apps developed for the Muse band, but I realized there are almost no apps, or at least it is not easy to find them via Google. Luckily I found an article from Anush Mutyala with the title Muse 101 — How to start Developing with the Muse 2 right now.
Anush has developed a hands-free slideshow that can be navigated by using eyeblinks. He was also able to switch Chrome tabs using eyeblinks and scrolling via measuring the focus/concentration of the user using only the raw EEG data. He even made a video summarizing solutions built on brainwaves.
In addition to Anush's article, I found a fascinating project. Scientists from the University of California, San Francisco (UCSF) have developed a solution that was able to recognize words/sentences with 96% accuracy.
There are some drawbacks of their solution:
- The number of recognized sentences is limited to 30-50 sentences.
- Their solution is not open-source, as far as I know.
Despite this, it is a fantastic achievement as they proved it is possible to recognize sentences by analyzing our brainwaves. And this was in 2020, I am very curious about where they are at the moment.
They have published their research paper in Nature Neuroscience journal.
So, in the end, these projects were my inspiration to start my journey in the field of Brain-Computer Interfaces (BCI).
The Idea
After reading the articles, my brain started to spin, and after thinking for quite a while, I came up with the idea of developing my version of a brainwave to text application.
I detect eyeblinks via brainwaves and convert them to text using the Morse code. However, it is much slower than the UCSF scientist's solution it is still a solution with which completely paralyzed people can communicate with their loved ones.
While looking for information about detecting eyeblinks, I realized there are already implemented solutions for detecting eyeblinks and converting them to text using the Morse code. Some of them use a camera, but others use an EEG band.
Despite this, the project is still valuable for the following reasons.
- I am building a framework that handles the whole communication with the EEG bands, so developers and neuroscientists can focus on what matters: implementing the different algorithms with which they can extract information from brainwaves.
- There are many different EEG devices, and my goal is to support many of them. As soon as you get the raw EEG data, it does not matter which device it came from.
- This is an open-source project, and I hope a couple of enthusiastic people will contribute to the project.
- This is my first step in the field of Brain-Computer Interfaces. A learning project from which I learn about brainwaves, Python, and the Kivy framework.
- I am providing a solution with which completely paralyzed people can communicate for the price of a mid-level phone (400€). My project is open-source and free, but it requires a Muse band (I recommend Muse S) and the Mind Monitor app.
- It can be used in complete darkness as no camera is needed.
We have the inspiration, the idea, so it is time to set a goal.
The Goal
Recently, I usually set HSMART goals for myself, which is my extension of the SMART goal concept. Here are the meanings of the letters:
- Humanish: It has to be something that makes this world a little bit better, and at least a small portion of humanity can benefit from it.
- Specific: The goal has to be clear and specific.
- Measurable: To track my progress and stay motivated, the progress has to be measurable.
- Achievable: The goal has to be realistic. It does not make much sense to set an unrealistic goal.
- Relevant: The goal has to matter to you. If you are working on something not relevant to your current situation, it will be tough to find motivation.
- Time-bound: Without a deadline, you can quickly lose focus. Parkinson's law straightforwardly expresses this: "work expands to fill the time available for its completion." From this, it is easy to see if you do not have a deadline, you can work forever without any real progress on your task.
So let's see my concrete HSMART goal:
- Humanish: I believe Brain-Computer Interfaces (BCI) can make the world better if used for the good. Having a framework that can be used to develop BCI-based apps and having a solution with which paralyzed people can communicate with their loved ones is definitely humanish.
- Specific: I want to develop an app with which completely paralyzed people can communicate with others. In addition to this, I want to develop a framework with which any developer can jumpstart their brainwave project.
- Measurable: I have defined multiple milestones to measure my progress
- Get the RAW data from the Muse
- Display live brainwaves
- Detect eyeblinks using brainwaves
- Classify the detected blinks based on their length
- Convert the blinks to text using the Morse code
- Design the UI of the mobile app
- Develop the app
- Write the article to participate in the Hashnode Writeathon
- Achievable: Considering that I have a full-time job and a family, the deadline is very strict, but it is still achievable. I have time for the project when my son is sleeping which means ~2 hours in the morning and 2-3 hours in the evening, and 8-10 hours during the weekend. On weekdays I always spend ~2 hours with my son when I arrive from work. We split the day into 1-2 hours long blocks during the weekend. One block spending time together and one block me time. We repeat this from the morning till the evening, so we spend a lot of time together, and everybody has time to focus on their things.
- Relevant: I am highly motivated to put my feet in the field of brain-computer interfaces (BCI). I recently visited a data analysis course as an external student at the Budapest University of Economics and Technology (BME). We learn fundamental data analysis, machine learning (ML), and deep learning. I will definitely put my recently acquired knowledge into practice in this project.
- Time-bound: From the moment I get the Interaxon Muse S, I have 3 weeks.
- One week to learn about brainwaves and develop the framework.
- One week to implement the blink detection algorithm.
- One week to create a mobile app and write an article to participate in the Hashnode Writeathon.
We have the HSMART goal, so it is time to start our project and select the technologies.
Selecting The Tech-stack
As Python is the number one programming language for data analysis and machine learning, the choice was almost straightforward. Apart from a few scripts, I have not used Python during my career, so this will be my first ever Python project. According to the TIOBE index, Python is the most popular programming language, and it is also easy to learn, so I chose Python.
At first, I wanted to develop a web app, and I selected Anvil Works as the framework for development as with it, you can create and host a web app in no time.
While reading the tutorials, I realized I have to communicate with the Muse device, which could be problematic from the browser. I will need not just a frontend but a backend implementation. To communicate with the Muse, it is highly advised to do it on a local network, which means I should host my backend locally.
After some thinking, I realized a mobile/desktop app is more suitable for my task. After a little googling and comparison, I decided to go with Kivy.
Kivy is a free open source cross-platform Python library for rapid development of applications that make use of innovative user interfaces, such as multi-touch apps and it is even GPU accelerated.
As I had no chance to learn a frontend framework like Angular in a few days, the idea of developing a mobile app in pure Python enlightened me.
However, after googling, I found Muse has an SDK (one of the main reasons I ordered the Muse). When I asked the Interaxon support for the link, they told me at the moment, there is no publicly available SDK, so I had to look for another solution.
Luckily I found Mind Monitor, which connects to the Muse and gets the RAW data, and it can even stream it using the Open Sound Control (OSC) protocol as UDP packets.
Because of this, pythonosc was a straightforward selection to grab the live EEG data.
That is enough from the tech stack. Let's start implementing the solution.
Learning About The Interaxon Muse S
The Muse S is a 4 channel band which means you can measure signals at 4 different points on your head. Thez are AF7, AF8, TP9 and TP10. AF7 and AF8 are positioned on the front of your skull, and TP9 and TP10 are placed at the back of your head. To learn more, just read the 10-20 EEG system description on Wikipedia).
You have to know that the scientist at UCSF used 120-200 EEG channels, and we only have 4. But I am completely fine about that, as having more channels would be overwhelming initially. Having such a limit inspires me to be creative, and thanks to the price of €379.99, it is affordable to anyone who would like to start developing brain-computer interface (BCI) based solutions.
However, I am pretty sure four channels will be adequate for a while. I already found the device that will probably be the next EEG device I use. It is the EPOC Flex Saline Sensor Kit which has 32 channels, but it costs four times as much as the Muse S ($1800).
Most probably, I will only get that if I find supporters for this project or in case, I hit the limits of the Muse S.
The Muse has the earlier mentioned 4 channels and 2 amplified Aux channels in the specification. It has a 256Hz sample rate and 12bits/sample resolution, which seems more than enough as usually, we are only interested in delta(0.5-4Hz), theta(4-8Hz), alpha(8-13Hz), beta(13-32Hz), and gamma(32-100Hz) waves. For more details, check this page.
The EEG band also has a gyroscope, an accelerometer, a PPG sensor (which can measure heart rate), and a thermistor.
The band comes with an app with which you can get real-time feedback about your meditation's effectiveness, and it has many guided meditations. In addition to this, it has many soundscapes and journeys that help you fall asleep and track your sleep.
That is more than enough about the Muse S band, and it is time to make our hands dirty and write some code.
The Implementation
This is my first real Python project, so I am sure my code is rather messy, mainly because I focused on the quick results.
But here comes one of the real advantages of open-source development. I can get feedback about my code and even code change suggestions in pull requests. So I am sure it only needs a few weeks, and this project will be a good starting point if somebody would like to start open-source contribution, learn Python, or brain-computer-interface (BCI) development. I will personally make sure it will be a kind and supportive community.
However, Python is a scripting language it also supports object-oriented development, so most of my code is object-oriented, but not all of them. I still have to find the balance.
Implementing Data Classes
I have created multiple Python modules. One of them is eeg_commons, which contains generic data that can be acquired from an EEG band. In addition to raw EEG data, it also supports gyroscope and accelerometer data which can be used in further applications.
I also created a WindowedSeries and an EEGSeries class to plot the data and get the median.
from enum import Enum
from statistics, import mean, median
import datetime


class DataType(Enum):
    EEG = 1
    GYROSCOPE = 2
    ACCELEROMETER = 3


class EEGChannel(Enum):
    AF7 = 1
    AF8 = 2
    TP9 = 3
    TP10 = 4
    AUX = 5


class EEGChannelMapping:
    def __init__(self, *args):
        self.index_to_channel = {}
        self.channel_to_index = {}

    def add_mapping(self, index, channel):
        self.index_to_channel[index] = channel
        self.channel_to_index[channel] = index

    def get_channel(self, index):
        return self.index_to_channel[index]

    def get_index(self, channel):
        return self.channel_to_index[channel]


class Data(object):
    def __init__(self, data_type):
        self.creation_time = datetime.datetime.now()
        self.type = data_type


class EEG(Data):

    @classmethod
    def create_eeg_data_map(cls, channel_mapping, data_tuple):
        data_per_channel = {}
        for idx, data in enumerate(data_tuple):
            data_per_channel[channel_mapping.get_channel(idx)] = data
        return data_per_channel

    def __init__(self, eeg_data_map):
        super(EEG, self).__init__(DataType.EEG)
        self.data_per_channel = eeg_data_map

    def get_channel_value(self, eeg_channel):
        return self.data_per_channel[eeg_channel]

    def channel_count(self):
        return len(self.data_per_channel)

    def get_channels(self):
        return self.data_per_channel.keys()


class Gyroscope(Data):
    def __init__(self, *args):
        super(Gyroscope, self).__init__(DataType.GYROSCOPE)
        self.x = args[0]
        self.y = args[1]
        self.z = args[2]

    def get_up_down_location(self):
        return self.x

    def get_tilt(self):
        return self.y


class Accelerometer(Data):
    def __init__(self, *args):
        super(Accelerometer, self).__init__(DataType.ACCELEROMETER)
        self.x = args[0]
        self.y = args[1]
        self.z = args[2]

    def get_left_right_pitch_acc(self):
        return self.x

    def get_up_down_acc(self):
        return self.y

    def get_left_right_acc(self):
        return self.z


class WindowedSeries:
    def __init__(self, window_size):
        self.elements = []
        self.window_size = window_size

    def add_element(self, element):
        self.elements.append(element)
        if self.window_size == len(self.elements):
            del (self.elements[0])

    def get_average(self):
        if len(self.elements) == 0:
            return 0
        return mean(self.elements)

    def get_median(self):
        if len(self.elements) == 0:
            return 0
        return median(self.elements)


class EEGSeries:
    def __init__(self, eeg_channels, series_length):
        self.time_series = {}
        self.last_stamp = None
        for channel in eeg_channels:
            self.time_series[channel] = WindowedSeries(series_length)

    def add(self, eeg_data):
        if self.last_stamp is not None and (eeg_data.creation_time - self.last_stamp).total_seconds() < 0:
            print('Data from past: ' + str((eeg_data.creation_time - self.last_stamp).total_seconds() * 1000))
            return
        else:
            self.last_stamp = eeg_data.creation_time
        channels = eeg_data.get_channels()
        for channel in channels:
            self.time_series[channel].add_element(eeg_data.get_channel_value(channel))

    def get_median(self, channel):
        return self.time_series[channel].get_median()


class EEGConverter:
    def __init__(self, converter):
        self.converter = converter

    def convert(self, data):
        converted_data = {}
        for channel in data.data_per_channel.keys():
            converted_data[channel] = self.converter.apply(data.data_per_channel[channel])
        return EEG(converted_data)
Implementing The Muse Band Handler
To communicate with the Muse band, I introduced multithreading to ensure the main thread was not blocked while getting the device's data.
As I have implemented the Observer design pattern by introducing listeners, the other parts of the code are not dependent on the used device, which means we can easily add support for new devices.
After we start the Muse plugin, it starts listening on the given UDP port to get the data from the EEG band via pythonosc.
from pythonosc import dispatcher
from pythonosc import osc_server
from eeg_commons.eeg_commons import EEG, Gyroscope, Accelerometer, EEGChannelMapping, EEGChannel
from threading import Thread

addresses = []


class MuseEEGChannelMapping(EEGChannelMapping):
    def __init__(self):
        super(MuseEEGChannelMapping, self).__init__()
        self.add_mapping(0, EEGChannel.TP9)
        self.add_mapping(1, EEGChannel.AF7)
        self.add_mapping(2, EEGChannel.AF8)
        self.add_mapping(3, EEGChannel.TP10)
        self.add_mapping(4, EEGChannel.AUX)


MUSE_EEG_CHANNEL_MAPPING = MuseEEGChannelMapping()


class MuseEEG(EEG):
    def __init__(self, *args):
        super(MuseEEG, self).__init__(EEG.create_eeg_data_map(MUSE_EEG_CHANNEL_MAPPING, args[0]))


class Muse:
    eeg_channels = [EEGChannel.AF7, EEGChannel.TP9, EEGChannel.TP10, EEGChannel.AF8, EEGChannel.AUX]

    def __init__(self, ip, port):
        self.ip = ip
        self.port = port
        self.listener_thread = None
        self.server = None
        self.listeners = {}

    def add_listener(self, data_type, data_arrived_func):
        if data_type not in self.listeners.keys():
            self.listeners[data_type] = []
        self.listeners[data_type].append(data_arrived_func)

    def notify_listeners(self, data):
        if data.type in self.listeners.keys():
            for callback in self.listeners[data.type]:
                callback(data)

    def handler(self, address: str, *args):
        if address.endswith('eeg'):
            self.notify_listeners(MuseEEG(args))

        if address not in addresses:
            addresses.append(address)
            print(address)
        raw_entry = str(address) + ':'
        for arg in args:
            raw_entry += "," + str(arg)
        # print(raw_entry)

    def start_muse_listening(self):
        disp = dispatcher.Dispatcher()
        disp.map("/*", self.handler)
        print("Connecting to  " + self.ip + ":" + str(self.port))
        self.server = osc_server.ThreadingOSCUDPServer((self.ip, self.port), disp)
        print("Connected")
        self.server.serve_forever()

    def start(self):
        self.listener_thread = Thread(target=self.start_muse_listening, daemon=True)
        self.listener_thread.start()

    def stop(self):
        print('Shutdown OSC server')
        self.server.shutdown()
That's it. With these few dozens of lines of code, we can get all the data from the Muse EEG band.
Let's talk about more exciting things.
Detecting and Classifying Eyeblinks
Usually, eyeblinks are considered artifacts that should be removed to have an artifact-free EEG for processing, but in our case, this is the only relevant information.
The eyeball acts as a dipole with a positive pole oriented anteriorly (cornea) and a negative pole oriented posteriorly (retina). Thanks to this, it highly affects our EEG data.
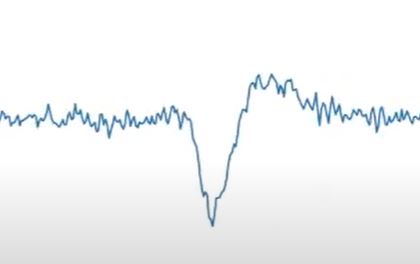
Here are the different types of blinks and how they appear in our EEG diagram.
Normal eyeblink:
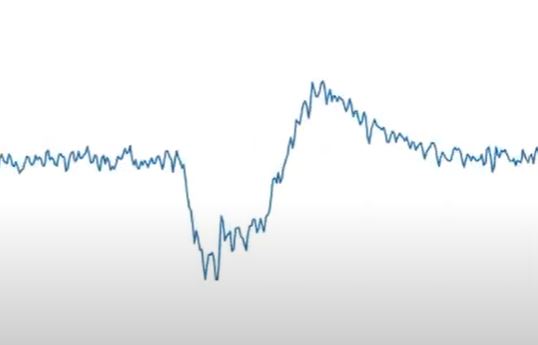
Short eyeblink:
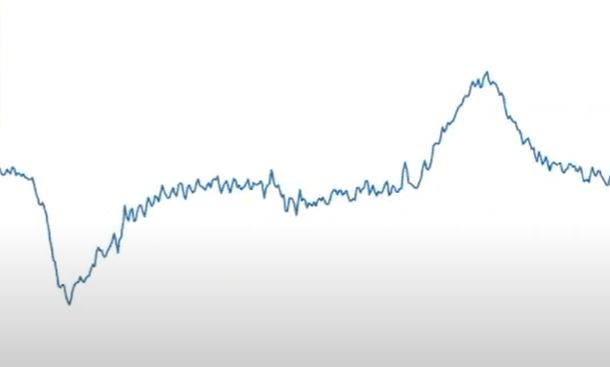
Long eyeblink:
I have even created a short video demonstrating how detected brainwaves change when we do things like moving our eyes, blinking, and clenching our jaw.
The detection algorithm is straightforward. After some observation, I realized eyeblink results in a considerable drop, then a slight rise in the EEG signal and the time between the fall and the rise is the length of the eyeblink.
Here is the detection code:
    def detect_blink(self, data):
        self.eeg_series_lock.acquire()
        base_level = self.eeg_series.get_median(CHANNEL_USED_FOR_DETECTION)
        self.eeg_series_lock.release()
        channel_value = data.get_channel_value(CHANNEL_USED_FOR_DETECTION)
        if channel_value > self.max:
            self.max = channel_value
        if (channel_value < base_level - BLINKING_START_FALL) and (self.blinking_start_time is None):
            self.blinking_start_time = datetime.datetime.now()
            if self.pause_timer is not None:
                self.pause_timer.cancel()
        if (self.blinking_start_time is not None) and (channel_value > base_level + BLINKING_STOP_RISE):
            blinking_end_time = datetime.datetime.now()
            blink_length = (blinking_end_time - self.blinking_start_time).total_seconds() * 1000
            blink = BlinkDetector.classify_blink(blink_length)
            for callback in self.blink_listener_callbacks:
                callback(blink, blink_length)
            if blink == Blink.VERY_LONG_BLINK:
                # Resetting conversion
                self.blinks.clear()
            else:
                self.blinks.append(blink)
            self.blinking_start_time = None
            if blink == Blink.SHORT_BLINK or blink == Blink.LONG_BLINK:
                self.pause_timer = Timer(1, self.pause_detected, args=['Pause detected'])
                self.pause_timer.start()
After having the eyeblink, I can classify them based on their length. I have experimented with different lengths of blinks, and I have defined the thresholds based on that.
There are the normal blinks which are very short. There are short blinks that are a little bit longer than the natural eyeblinks.
Then comes the long blink and the very long blink.
Here is the code for the classification:
    def classify_blink(blink_length):
        if blink_length < NORMAL_SHORT_BLINK_BORDER:
            blink = Blink.NORMAL_BLINK
        elif blink_length < SHORT_LONG_BLINK_BORDER:
            blink = Blink.SHORT_BLINK
        elif blink_length < LONG_VERY_LONG_BLINK_BORDER:
            blink = Blink.LONG_BLINK
        else:
            blink = Blink.VERY_LONG_BLINK
        return blink
That was it. As you can see, there is no magic here. I did not even use Fourier transformation as it was unnecessary for this first step, but I will definitely introduce it soon.
We have almost all the logic in place, and we can start implementing our mobile app using Kivy. But before that, let's sketch our UI.
Sketching the UI
Whenever I have to draw a diagram, create a UI mock, or create a mind map, my one-to-go tool is draw.io.
Draw.io is free, and it contains many flexible elements you can use to create whatever you want.
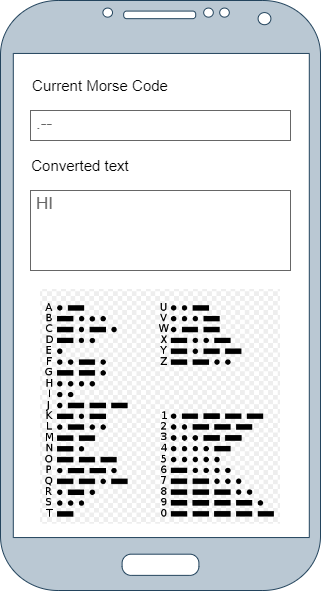
So here is my mockup:
Finally, we can start using Kivy to implement our UI.
Implementing the UI using Kivy
In Kivy, layouts are used to arrange widgets within a component. If you have ever worked with a frontend framework, you probably already know these.
I have experience with C#, Java Swing, and Windows Forms regarding the frontend. Most of them are outdated by now, but most of the frontend frameworks have similarities.
We split the main widget into an upper and lower part using BoxLaxout. The upper part is also a BoxLayout which will contain the two Labels and TextInputs. Again, if you have ever worked with a frontend framework, you are already familiar with most of the widgets which can be used. At least I am pretty sure you used labels and text input fields.
The bottom panel has a GridLayout, containing all the Morse code-letter pairs functioning as a dictionary to aid communication.
The UI can be created using Python code or Kivy's design language kv.
I have created my user interface using Python code. Here it is:
class MainWidget(BoxLayout):
    def __init__(self, **kwargs):
        super(MainWidget, self).__init__(**kwargs)
        self.orientation = 'vertical'
        self.morse_code = ''
        self.converted_text = ''
        Window.clearcolor = (1, 1, 1, 1)
        self.top_panel = BoxLayout(orientation='vertical', size_hint=(1.0, 0.5))
        self.padding = (15, 15, 15, 15)
        self.color = (1, 1, 1, 1)
        self.orientation = 'vertical'
        self.add_widget(self.top_panel)

        self.morse_code_label = Label(text='Morse code', font_size=NORMAL_FONT_SIZE, size_hint=(None, 0.1),
                                      halign='left', color=(0, 0, 0, 1))
        self.top_panel.add_widget(self.morse_code_label)

        self.current_code = TextInput(multiline=False, font_size=NORMAL_FONT_SIZE, size_hint=(None, 0.1))
        self.current_code.readonly = True
        self.top_panel.add_widget(self.current_code)

        self.output_text = Label(text='Text output', font_size=NORMAL_FONT_SIZE, size_hint=(None, 0.1),
                                 halign='left', color=(0, 0, 0, 1))
        self.top_panel.add_widget(self.output_text)

        self.text_output = TextInput(multiline=True, font_size=NORMAL_FONT_SIZE, size_hint=(1.0, 0.7))
        self.text_output.readonly = True
        self.top_panel.add_widget(self.text_output)

        self.bottom_panel = GridLayout(size_hint=(1.0, 0.5), cols=6, rows=6)
        self.add_widget(self.bottom_panel)
        for name, member in MorseCode.__members__.items():
            if name.startswith('N_'):
                text = member.code + ' ' + name[2:]
            else:
                text = member.code + ' ' + name
            print('text: ' + text)
            self.bottom_panel.add_widget(Label(text=text, font_size=LARGE_FONT_SIZE, color=(0, 0, 0, 1)))
And here is the result:
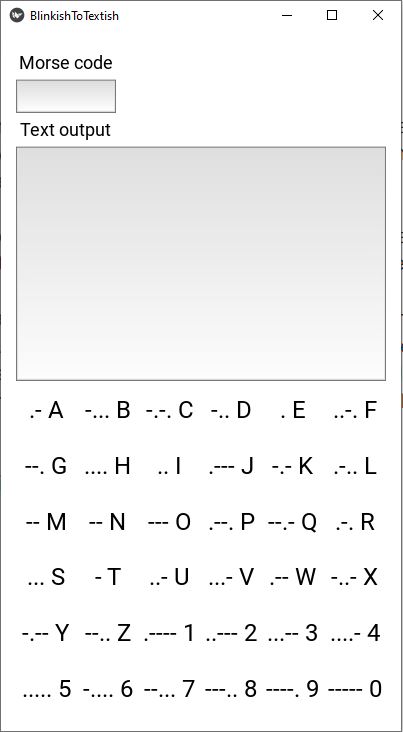 It could look better, but as my main goal is to create a useful open-source app, it is completely fine for me. It does what it should do.
We only have one final step to finish our application. We have to implement the eyeblink to text conversion and display it on the UI.
Implementing Eyeblink to Text conversion via Morse Code
Here is the Morse code enum:
class MorseCode(Enum):
    A = ('a', '.-')
    B = ('b', '-...')
    C = ('c', '-.-.')
    D = ('d', '-..')
    E = ('e', '.')
    F = ('f', '..-.')
    G = ('g', '--.')
    H = ('h', '....')
    I = ('i', '..')
    J = ('j', '.---')
    K = ('k', '-.-')
    L = ('l', '.-..')
    M = ('m', '--')
    N = ('n', '--')
    O = ('o', '---')
    P = ('p', '.--.')
    Q = ('q', '--.-')
    R = ('r', '.-.')
    S = ('s', '...')
    T = ('t', '-')
    U = ('u', '..-')
    V = ('v', '...-')
    W = ('w', '.--')
    X = ('x', '-..-')
    Y = ('y', '-.--')
    Z = ('z', '--..')
    N_1 = ('1', '.----')
    N_2 = ('2', '..---')
    N_3 = ('3', '...--')
    N_4 = ('4', '....-')
    N_5 = ('5', '.....')
    N_6 = ('6', '-....')
    N_7 = ('7', '--...')
    N_8 = ('8', '---..')
    N_9 = ('9', '----.')
    N_0 = ('0', '-----')

    def __init__(self, character, code):
        self.character = character
        self.code = code

    @classmethod
    def get_character(cls, morse_code):
        for name, member in MorseCode.__members__.items():
            if member.code == morse_code:
                return member.character
        return None
The conversion happens the following way:
If we detect a short blink, we convert it to a "." and if we have a long blink, we convert it into a "-" character. As soon as we do not detect a blink for 1 second, we transform our Morse characters into a letter or a number and display it in the "Text Output" widget.
If we detect a very long blink of 1,2 sec or more, then we delete the last converted character. Believe me, with the current state of the app, you will use this quite often. 😊
Here is the code:
    def blink_detected(self, blink, blink_length):
        print(str(blink) + ' with length: ' + str(blink_length))
        if blink == Blink.SHORT_BLINK:
            self.morse_code += '.'
        elif blink == Blink.LONG_BLINK:
            self.morse_code += '-'
        elif blink == Blink.PAUSE:
            try:
                char = MorseCode.get_character(self.morse_code)
                if char is not None:
                    self.converted_text = self.converted_text + char
                    print('Converted "' + self.morse_code + '" to ' + char + ' full text: "' + self.converted_text + '"')
                self.morse_code = ''
            except AttributeError as e:
                logging.critical(e, exc_info=True)
                print('Invalid Morse code: ' + self.morse_code)
                self.morse_code = ''
        elif blink == Blink.VERY_LONG_BLINK:
            self.morse_code = ''
            self.converted_text += 1
        Clock.schedule_once(self.update_ui)
There is no magic here, except in the last line. It is needed as the UI cannot be updated from an arbitrary thread. Our EEG handler runs on a separate thread, so the last line schedules the call of our UI update with zero delays. As soon as there are no other jobs in the queue, our UI will be updated.
We are ready with the development so it is high time for the demo.
The Demo
I could say the demo did not go well, but that wouldn't be true. I wanted to demonstrate the current state of the blinkish to textish app. As you can see from the video there is space for improvement. I already have many ideas but in case you have too, do not hesitate to contact me.
Here is the result of 3 weeks of work:
We have only one step remaining, which is packaging our app to have an Android app.
Creating Our Android App
Here comes the beauty of Kivy:
You have to write only one application, and you can generate an app for Android, iOS, macOS, and Windows.
As I am developing on Windows and as I have an Android phone, my choice is to make an Android package (APK).
There are multiple ways to do that:
- Using Buildozer
- Packaging with python-for-android
- Packaging your application for the Kivy Launcher
According to the documentation, Buildozer is the easiest. You can find all the info here regarding packaging.
Just follow the instructions, and you will have an app in no time.
I have included the necessary steps in the Readme.MD file of the project.
You can find the project on my GitHub.
Huh. That was quite a ride, but I have good news:
That's all, folks. We are completely ready with our application. We are not just ready, but we implemented a mobile/desktop app using only pure Python. I think this can be called "Implementing a mobile app the Pythonian way." Or, because I am not too good in Python yet, I would call it "Implementing a mobile app the Pythonianish way".
Before we leave, let's talk about my plans for the future.
Plans for the future
I have not overthought the future as I was focusing on the present, but here are some ideas I came up with:
- Instead of using hardcoded values for blink classification, a training feature could be introduced which guides you through the process of doing eyeblinks with different lengths. Based on this info, you can immediately start using the app with little or no error, and later when you get used to it, you can calibrate again to achieve a better speed.
- Make the application more robust by filtering artifacts like jaw movement and eye movement.
- Modify pythonosc, or implement our solution to grab the OSC data streamed by Mind Monitor to access the timestamps based on which we can rearrange the samples.
- Making a more robust solution by analyzing only the relevant part of the frequency spectrum using Fourier transformation.
- Using data like eye movement, gyroscope, and accelerometer to implement a much faster brainwave to text solution.
That's all, folks. I hope you enjoyed it.
I would love to hear from you. Whether you are just thinking about starting your own brainwave-based BCI project or have already developed something, just contact me and let's have a friendly chat. I am pretty sure both of us can benefit from that.
P.S.: Something good will happen to you today!

Hackernoon interviewed me, so if you would like to learn more about me, just click here and read it!
Become an agileish superhero!
Learn how to memorize anything in the world. In this series, I teach you everything I know about learning and memorization, including memory palaces, marker images, number memorization techniques, associations, etc.
You can already find the first videos on my Youtube channel in which I show you that it is possible to memorize such boring things as positions of circles.
Don't forget to read How You Can Become An Agileish Super Learner AKA How You Can Become A Super Thinker AKA The Proof Of Concept (POC) before you watch the videos.
Join the Agileish Superheroes Facebook group to learn memorization techniques, thinking techniques, agility, reading and learning techniques and also to get notified about new live sessions and videos
As I am a crazy person, I have open-sourced my life on GitHub on Fool's day.
I am sharing my thoughts, writings, and creations, and as I am frequently committing, I have open-sourced my thinking process, my writing process, and also my creation process.
Just click here to check my open-sourced life on Github!
Read my story, in case you would like to understand how I think and act as a developer and tester in the real world. You can get some insights about my humor, and I am also happy to tell you that this is my article about which I am the proudest of now.
In case you do not want to miss my posts, just follow me here on Hashnode, on LinkedIn, on Twitter on Medium.com, on dev.to, on Hackernoon and even on Instagram.
- Minnie: What do you have for today?
- Miki: Nothing.
- Minnie: Nothing nothing?
- Miki: It is so nothing it is not even nothing.
- Maudience: Stop it. We are losing our readers!
- Miki: But there is nothing else to read here.
- Maudience: Fair enough.


